Sunday, June 29, 2008

Daring Bakers - A Non Danish Braid

If you have come to visit me in the hope of seeing some Daring Baker Danish Braid I'm afraid you will be disappointed.

Life has intervened in my best laid plans. I still hope to make it - hopefully soon.

But don't despair you can see a squillon beautiful braids through the Daring Bakers' Blogroll.

I hope you are having a nice day.

Cheers
KJ

Friday, June 27, 2008

Challenge Book #17 - Lovely Lemon Curdy Pud (cue eyeroll)


Jamie Oliver calls this 'A Lovely Lemon Curdy Pud'. Hrmmmph. Whatev Jamie. This is a Lemon Delicious Pudding or my name is Morag McSpuckleduck.

I know this because I have eaten hundreds of them. My Aunty is the best delicious pudding makers in the world. Her orange delicious pudding is to DIE FOR.

Now I am a Jamie Oliver fan, but I consider this to be a major failing of his - the tendency to give ridiculously twee or horribly gushing names to dishes. 'A Rather Pleasing Carrot Cake' anyone? Or how about some 'Bloomin' Easy Vanilla Cheesecake'? Would you prefer the 'Superb Sweet and Sour Squash' or the 'Incredible Boiled Butternut Squash'? Gaaaah!!!!


Petty grumblings aside, Lemon Delicious is a simple and lovely pudding. It's decidely old fashioned and has been enjoyed by many generations of my family.

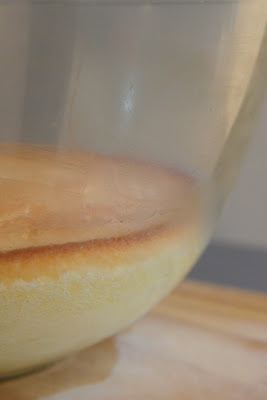
A lemon curd custard settles on the bottom while a spongey cakey layer sets on the top. It should be served just warm. It has a delicious citrus tang which contrasts beautifully with some sweetened thick cream.

It's dead easy to make. I added a bit more lemon juice, as the pudding seemed a bit bland and I like it with a fair bit of lemony pep. I think just adding lemon juice to taste is the way to go.


This pudding is from Challenge Book #17 in the KJ wants a Kitchen Aid Challenge - Happy Days with the Naked Chef. I have used this book quite extensively. I can thoroughly recommend the steak and guiness pie, the pineapple with mint sugar and the summer fruit jellies. Avoid the the honey and banana bread at all costs, unless you really like chewing on hockey pucks.

Lovely Lemon Curdy Pud
(adapted from Happy Days with the Naked Chef)

55gm butter
115gm sugar
1 lemon, grated rind and 3 tbspn juice
2 large eggs, separated
55gm self raising flour
285ml milk

Cream the butter, sugar and lemon rind. Beat in the egg yolks and flour. Then add the flour and lemon juice.

Whisk the egg whites until stiff peaks form. Gently mix into the lemon batter. Pour into a buttered dish. Place in a roasting tray about a third full of water.

Bake in a 200C oven for about 45 minutes. The top should be set and cake like and golden brown.

Sunday, June 22, 2008

Taste & Create - HobNobs


I love a good HobNob me!!! A definite result of my English ancestry. I also have a prediliction for Yorkie bars, clotted cream, rainy days, hedgehogs and Ronnie Barker.

The recipe comes from my Taste & Create partner for this month - Kittie from Kittens in the Kitchen. I was already familiar with Kittie's blog as she was my partner back in April when I made her delicious Spinach and Garlic Soup.


HobNobs are a delicious cruchy oaty biscuit made by McVities. Nice Cup of Tea and a Sit Down has done a review and they suggest that they are "an ideal ice breaker at say a romantic biscuit moment".

I have no objection to trying this out, but I'm not sure what 'a romantic biscuit moment' would be??? Sure, I can see the concept back in say Edwardian times when the only chance of physcial contact was to brush fingers while passing a plate of biscuits over a cup of tea in the drawing room. But what about today? You catch someone's eye across a crowded bar and whip out a few HobNobs to entice them over? The mind boggles.


Anyway whatever you might do with them, these HobNob are great.

I had to add a bit more flour (about 1/3 to 1/2 cup) than the recipe suggested. I initially put this down to my poor maths in converting the butter measurement from cups to grams. But Ivy over at Little Ivy Cakes had the same experience. You should be able to roll the mixture into reasonably firm balls with your hands.

I was absolutely delighted with them. They were dead tasty and crisp and buttery. I halved the recipe, but then I made them a bit smaller than suggested. I ended up with a lot of HobNobs.

I am going to dip some of them in chocolate. So then I will have chocolate HobNobs. Apparently there's a chocolate orange version as well. I'm not too sure about that. Chocolate, orange and oats...hmmmmmmm. Maybe I will leave it for another day.

The recipe for these HobNobs can be found here on Kittie's site.

Tuesday, June 17, 2008

Challenge Book #16 - Lattice Slice


This recipe is a slice of my childhood. This was my Mum's favourite recipe for get togethers - Horticultural Club meetings, tupperware parties, sewing circles. There always seemed to be a tray of this walking out our front door. Fortunately, she would always leave a few squares behind for my sister and I.

And it was not only my Mum making this. It was a favourite in our town. It would turn up pretty much everywhere - brownie meetings, netball breakups, picnics.

So much so, that it was certain starter in any local charity cookbook. It made it into this one twice. This book dates from before the days of calorie consciousness - there's a whole whallop of cream cheese and butter in there.
Amazingly, until now I have never made it myself. There's no reason for this, it just kind of fell off the radar when I moved away from home.

It seemed time to rectify this when I was asked to bring a plate to an afternoon tea. And it would give me the chance to cross off another book in my KJ wants a Kitchen Aid Challenge. This is Challenge Book #16.

It is the easiest thing to make. Really it could not be simpler. And it is so yummy. Creamy smooth cheescake with the snap of crisp sugary biscuits.


My Mum always made the filling plain. Which is delicious. But I couldn't help myself - I mixed in some raspberries and grated chocolate. Also great. I think you could mix in pretty much any flavours you want.

I have no idea about the origin of lattice biscuits. All I know is that they are made by Arnotts and are available in Woolies supermarkets. They are a bit like a sweet glazed SAO. I think really you could use any crisp sweet biscuits or pastry.

I'm so glad I rediscovered this!!!


Lattice Slice
(adapted from Care for Kids Morning Tea Recipes)

250gm cream cheese
250gm butter
1 cup castor sugar
1 tspn vanilla extract
2 tspn lemon juice
2 tspn gelatine
lattice biscuits

Beat together cream cheese and butter. Add sugar, vanilla and lemon juice. Dissolve the gelatine in water and stir in.

Line a small deep baking tray with the lattice biscuits, golden side down. Spread the mixture over the biscuits. Add another layer of lattice biscuits on top, golden side up.

Refrigerate until set. Cut into squares.

Thursday, June 12, 2008

Challenge Books #14 & #15 - Char Siu Bau


I love Asian food. I could regale with you endless tales of my culinary adventures in China and Viet Nam. But I will spare you, your life is too short. Consider your thank yous gracefully received.

But the thing is that I rarely cook Asian food. There is a reason for this - I totally suck at it. To cook Asian food well you need to be able to balance flavours. I struggle with this. It ends up bland, or too salty or too sweet or too something.

But naturally, that has not stopped me from buying cookbooks on the subject. Oh no!!!

And so we have Challenge Books #14 and #15. Into the Vietnamese Kitchen I bought after I returned from living in Hanoi. A Little Taste of China I bought after a trip along the Silk Road. Until now, I have never made a single thing from either. Shame on me!!!!!

Fortunately, the KJ Wants a Kitchen Aid Challenge has forced me to rectify this. There was no great difficulty in deciding what I would make - char siu bau (or pork buns to most of us). I am a nibbler by nature. My perfect eating habitat is having lots of different little dishes to choose from. I was born for yum cha.

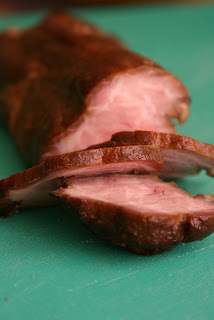
The first step to Char Siu Bau is Char Siu (barbecued) Pork. I kinda wish I could infuse the whole process with the mystery of the orient, by making it out to be all complex and mysterious and hard. But really, there is nothing easier. It's just a question of mixing up the marinade and leaving the pork overnight so you end up with this.


And then roasting in the oven so you end up with this.


The recipe suggests pork shoulder. I used pork neck which was on special at the butchers. I had to cook it a bit longer than the recipe specified to get it done. But that's hardly mystical - I have a dodgy oven.

Next, came the dough. Again, there is nothing different here to most other yeast doughs. Just mix some basic ingredients together and leave to rise. Perhaps the only difference is that the dough is activated by kneading in baking powder as the last step.


This dough is fabulous to work with. It is lovely and soft and pillowy.

While the dough was rising I converted the cha sui pork into filling for the buns. The pork is diced and mixed with some oyster sauce, sesame oil, sugar and rice wine. It literally took all of five minutes.


I ended up doubling the amount of filling suggested in the recipe. I rolled my dough quite thinly so I could fit much more into each bun.

Now it was just a question of rolling out little circles of dough and adding some filling. The dough is gathered up over the top and pressed together to seal.


To be authentic they should be cooked in bamboo steamers over a wok. As I do not own bamboo steamers or a wok, I used a metal steamer over a stockpot. It worked just fine.


I steamed them seam side down to form little smooth balls.


And was all this effort worth it. Oh yes!!! Oh my, YES!! They were fantastic. Incredibly tasty and delicious. My neighbours came over and we scoffed the lot in one sitting. I was ever so delighted with how they came out.

I still have a couple of strips of pork tucked away in my freezer, so these buns will be making a reapparance in my kitchen soon.

Char Siu Pork
(adapted from Into the Vietnamese Kitchen)

1.1kg of boneless pork shoulder

marinade

2 cloves garlic, minced
2 tbspn sugar
1/2 tspn chinese five spice powder
3 tbspn hoisin sauce
2 tbpn honey
1 1/2 tbspn shaoing rice wine or dry sherry
2 tbpsn light soy sauce
1 tbspn dark soy sauce
2 tspn sesame oil

Cut the pork into strips about 15cm long and about 5 cm thick.

Mix all the marinade ingredients together in a large bowl. Add the pork and coat evenly. Cover and refrigerate for 6 to 8 hours, turning 2-3 times.

Remove the pork from the fridge about 45 minutes before you wish to begin cooking. Place a rack in the top third of the oven and heat to 250C.

Line a roasting tray with alfoil and add a roasting rack. Put the pork on the rack with plenty of space in between each piece.

Roast the pork in the oven, basting with the marinade every ten minutes. To do this, roll the pork in the marinade using tongs.

The recipe suggests:

The pork is done when it looks glazed and charred. It should register about 63C on a meat themometer. This should take about 30-35 minutes.

My experience:

The pork was still very rare at this stage. I cooked it for about 50 minutes, at which point it was cooked but ever so slightly pink.

Remove from the oven and allow to rest for 10 minutes to seal in the juices. Thinly slice the pork and serve warm or at room temperature.

It can be frozen for up to 3 months.


Basic Yeast Dough
(adapted from A Little Taste of China)

3 tbspn sugar
250ml of warm water
1 1/2 tspn dried yeast
400gm of plain flour
2 tbspn oil
1 1/2 tspn baking powder

Dissolve the sugar in the water and add the yeast. Stir lightly and then set aside for ten minutes, until foamy.

Sift the flour into a bowl, add the yeast mixture and the oil. Mix to a rough dough and then turn out onto a lightly floured surface. Knead for 8-10 minutes or until the dough is light and elastic.

Lightly coat the dough in oil and place in a bowl. Leave to rise for about 3 hours.

Punch the dough down. At this stage it can be stored in the refrigerator for later use.

To use the dough, make a well in the centre and add the baking powder. Knead the dough until it is well incorporated.

Char Siu Bau
(adapted from A Little Taste of China)

1 tspn oil
250gm char siu pork, diced
3 tspn shaoxing rice wine
1 tspn sesame oil
2 tbspn oyster sauce
2 tspn light soy sauce
2 tspn sugar
1 qnty of basic yeast dough

Heat the oil. Add the pork, wine, sesame oil, oyster sauce, soy sauce and sugar and cook for 1 minute.

Divide the dough into 12 or 24 pieces depending on how big you want your buns. Roll the dough into circles with the edges thinner than the middle.

For small buns, place 1-2 tspn of filling into the centre of the dough circle. For big buns, use 3-4 tspns. Use as much filling as you can comfortably manage. Pinch the top together and ensure they are well sealed.

Place the buns into a steamer lined with greaseproof paper. Cover and steam over simmering water for about 15 minutes. The buns should be well risen and skewer inserted into the centre should come out hot.
Monday, June 09, 2008

KJ Wants a Kitchen Aid Challenge Quarterly Review

As you may or may not know, on 1 March this year I made a resolution. I would not buy a single new cookbook until I made at least one recipe from every cookbook I already own. All 52 of them. If I am good, I can buy myself a new mixer.

I have my heart set on a Kitchen Aid. It's going to be pistachio green. And I will hug it and squeeze it and call it George.

Anyway, having hit the quarter way mark I thought it was time for a recap. So far this challenge has been fantastic. It has forced me to try new things, instead of just making endless cakes and ice creams. I am particularly pleased that I have blogged some savoury dishes. I always find these far more challenging than baking. So it is particularly satisfying when they come out well.

The highlight so far has definitely been the Plums in Marsala I made back in March. These were simply divine. This would be closely followed by the Water Pastry. I was delighted with the way this came out.

And a big thanks to everyone who has left such kind and encouraging comments. I am simply delighted that anyone visits my blog and I love feedback.

Here is a brief overview.


Challenge Book #1 - Toasted Coconut Ice Cream and Pear Caramel Ice Cream adapted from The Perfect Scoop by David Lebovitz.

Delicious and delicious. I seriously doubt that there is a less than delectable recipe in this book.


Challenge Book #2 - Plums in Marsala adapted from How to Cook Book One by Delia Smith.

An eventful experience, with oven doors flying open all over the place. But oh so so worth it. DIVINE!


Challenge Book #3 - Rocky Road Ice Cream adapted from Iced.


Fun to make and fun to eat.


Challenge Book #4 - Coconut Lemon Twinkies adapted from The Sweet Spot by Pichet Ong.

They looked good and they tasted good.


Challenge Book #5 - Italian Stallion adapted from Simply Simpatico by the Junior League of Alburquerque.

Blokey food at its best.


Challenge Book #6 - Water Pastry, Kofte and Pilaf adapted from Turkish Cookery by Inci Kut.

Delicious!!! I was so excited that this came out so well.


Challenge Book #7 - Membrillo adapted from Cook's Companion by Stephanie Alexander.

There were a few issues - namely its tendency to burn. But it was a great result.


Challenge Book #8 - Quince Yeast Cake adapted from Maggie's Table by Maggie Beer.

Not a great success, but I can see the potential.


Challenge Book #9 - Pot Roasted Quinces adapted from Maggie's Harvest by Maggie Beer.
Again not a total success, as the jelly didn't set. But it was still a delight to eat.


Challenge Book #10 - Plum and Cinnamon Oat Slice adapted from How to Cook Book Two by Delia Smith.

Loved the plummy jam filling.


Challenge Book #11 & #12 - Ice Cream Sundae adapted from Falling Cloudberries by Tessa Kiros and Family Circle's Classic Essential Chocolate.

A traditional favourite. Simplicity at its best.


Challenge Book #13 - Chicken Leek Pie adapted from Family Circle's Classic Essential Pies.

Hard to go wrong here - with puff pastry, chicken, bacon, leeks and cream.


As for Challenge Book #14, here is a sneak peek. Stay tuned.

Thursday, June 05, 2008

Challenge Book #13 - Chicken Leek Pie


I cannot resist puff pastry. It's just so good. It's all golden, crispy and buttery. Wrap it around an old sock and I would still try to eat it.

So it was a foregone conclusion that I would like this chicken leek pie.


Fortunately, the filling is worthy of praise in its own right. But really, how can you go wrong with chicken, leeks, bacon, cream and a lash of seasoning. I was always going to like that as well.


And it's dead easy to pull together. And it looks nice. So really, it's an all around foolproof winner.


And here I am at Challenge Book #13. Woohoo, I am motoring along. This one is Classic Essential Pies from the Family Circle collection. Yet another one of those little books that sit so invitingly at supermarket checkouts. While I've owned this book for many, many years, I've only ever made one other recipe from it. So it's about time I made some use of it.


Chicken Leek Pie
(adapted from Family Circle Classic Essential Pies)

30gm butter
2 small leeks, whites only
3 rashers bacon
3 chicken breast fillets
1/2 cup cream
2 egg yolks
salt and pepper
2 sheets of puff pastry
1 egg, beaten

Thinly slice the leeks, dice the bacon and cut the chicken breasts into thin strips.

Melt the butter in a fry pan, and saute the leeks over a low-medium heat for about 10minutes. They should be very soft and golden. Spoon from the pan and set aside.

Fry the bacon until brown. Spoon from the pan and set aside.

Add the chicken and cook until lightly brown. Remove from the pan.

Wipe the pan clean. Return the bacon, chicken and leeks. Add the combined cream and eggs. Cook gently for about two minutes. Season with salt and pepper. Remove from the pan and allow to cool.

Cut thin strips from around the edge of one pastry sheet. Place the sheet on a lightly greased oven tray. Spoon on the chicken mix, leaving a border (about 2cm) all around the edge.

Brush the edge of pastry sheet with water and then lay the second pastry sheet over the top. Brush the edges with water and then roll them back over toward the middle of the pie and tightly seal. You can decorate with the cut strips of pastry.

Prick the pastry with a fork and brush with the beaten egg.

Bake for 30 minutes or until golden brown in a 210C oven.

Subscribe to A Cracking Good Egg by Email
Australian Food Bloggers Ring
list >> random >> join
Site Ring from Bravenet